Tuesday, December 2, 2014

Souvenirs de France

Several years ago one of the women in my patchwork club made a beautiful red wall hanging. She had several bags of left over fabric and when I expressed interest she "loaned" them to me. I was to take what I needed and give back the rest. I did not want a wall hanging, when I looked at those fabrics, I wanted a jacket.

In my stash I have an old pattern for a jacket that I have modified and made more than once. My pattern is on a piece of plastic and in the pattern pack are my notes of where I changed the original (I seem to recall Simplicity, vintage, 1980s...) I changed the sleeves so they were less cupped and symmetrical (something you do not do for shirts, but for a loose jacket it is just easier to assemble. 

Years ago, when rag quilts were all the rage I made a jacket using this pattern. I still wear it. I added patch pockets and came up with a fun easy way to attach the collar. This collar attachment is to easy so someone must have done it before, but my notes are really from the early days of the internet where we did not have the resources we have now. I have it in my notes what to do, good thing too because to reinvent the wheel would take me a little thought process.

All of the red pieces meant that I needed to piece them together. I decided to do the rag quilt method again just because I thought the texture would be nice with the red, mostly linen, fabrics. As this is a souvenir I wanted to capture what I like about France. So here is a tour of my jacket.

In an old copy of Mon Ouvrage I found a raised work French knot butterfly. I love butterflies. I forgot to write down the publication date of the butterfly, but it is most likely late 1940 to early 1950.


Here it is on my jacket
Since I sew, I wanted  a dress form. From Pinterest I found a couple of ornate ones and so I copied and modified one of them I found.  To the left is my drawing and there it is on the jacket.
Next up was the  Eiffel Tower of course. Again I found photos and traced off the design.
I love cats but can not have one, or any pet for that matter. Going again on line I found images of cats and drew my rendition of what a proper french cat would do given the chance.
Here it is on the jacket. Pierre, le chat rouge needed a moustache, don't you think?


One of the techniques we learned at my patchwork club was Broderie Swiss or chicken scratch (horrible name). Here is the piece that I was able to incorporate into the jacket.
 In an vintage copy of La Mode Illustree I found a line backstitch pattern. This pattern was one of 4, the other 3 you had to mail order for a small fee. Just darn! I do not think I can order it now. the other 3 designs were just as nice as this one. I failed, like the butterfly to write down the dates of the publication, but it was most likely 1897. 
I copied it off and then penciled in the lines so that they could be better seen. It was then traced on to the fabric. Here is my rendition of the design

Finally what the jacket looks like in its entirety, here is the front:

And back:


Saturday, November 29, 2014

Black Butterfly Jacket

Finally, another UFO is complete.! It is a year overdue and it is for a friend. As soon as I have an embroidery machine again I need to make one for myself! My machine is now in storage. The designs are from Zundt and the lace tape is modern. A 12 weight Sulky thread is sewn on top of the tape for added interest. The heavy weight grape leaf lace across the bottom hem and sleeves I bought at a flea market here in France. I have 26 meters of it in both white and off white. I loved it and as it was priced by the  bolt so I bought them both. One can never have too much lace to play with. This does not qualify as a lace bit, but it has been a wonderful addition to my stash!

So here is the jacket front:

And the  back:


On a final note, the sheet with the blue from this blog is finally out of the Biz bucket. It soaked for 2 weeks. 

The blue is very faint but still there. Not like it was before. This item is now totally usable for whatever project I decide to use it for in the future.


Saturday, November 22, 2014

Never Disappoint a Teenager

Some weeks ago I was asked if I would sew some scout badges on to a shirt for the daughter of a friend. I said yes, was given the shirt and then promptly got busy with life.

Yesterday at a party, I was asked about it. She needs it tomorrow. When I told her I had not done it, you know that look. the one that says "I will be an outcast at my meeting since I am not dressed correctly." Ouch! My bad!

So this morning I got up early (don't feel sorry for me, I am an early riser and do my best work before 8am) and I sewed the badges on to her shirt.

I grew up with Girl and Boy Scouts. I remember cookie drives and how important getting those badges sewn onto the uniform was. I so felt her pain. In France scout organizations are a little bit different. Both boys and girls scout together.


I was given a copy of "Les Essentiels de la Boutique". On the back of the front cover is this picture  of where all the badges should go. There must be more, you know, something like, "The badge will be placed 2cm below the shoulder seam", or something like that.
Look! It says I can go on line to get the correct placement of all of the badges. Cool! So off I go searching the website for placement information. What I found was this:
Love it! No military precision. As an experienced sewer, this means it needs to be centered and sewn neatly and roughly where it shows it is supposed to go. The  Insigne de Territoire (Lorraine) and Bande de Groupe (Rodger Clement) are on the  right sleeve. The shoulder seam and pocket on the sleeve do not match so they were centered on the pocket. The Lorraine badge was longer than what was sewn on. About 5 mm were folded under top and bottom so that the two badges would fit on the sleeve. Not at all like the space shown on either placement picture.
Right sleeve only requires the Bande d'epaule.  The distance from  the top was matched with the Bande de Groupe on the other sleeve. The Insigne du SF/OMMS/AMGE was centered over the left front pocket.

Finally here is the final result:

Placement on the  right shoulder leaves room for the pistes d'action badges should she ever get any. 

I really need to get back to sewing lace bits...

Monday, November 17, 2014

A Meeting with Patchwork France

When I first moved to France, almost immediately, I joined Patchwork France. Talk about a first scary meeting as my French skills were almost non-existent. As the token native English speaker in this group, I was greeted with open arms and was made to feel like they wanted me back. After being a member for several years I had to drop out because the meetings for 2 solid years were on weekends I was not in town. 

This last weekend there was a meeting and I was invited to come. I am glad I did. Each meeting involves a project and the projects are always handwork and most of the time are something fun. Here is the project we did this past weekend:

We were given a number of designs to choose from and in three sizes. Starting with the largest of the three, I decided on the snowman. The method we used for embroidery was whatever we wanted to do so I spent most of the day playing with the embroidery thread.
This is as far as I got on this one. I had time to start embroidering the second one before our time was done.

Members bring show and tell to hang on the walls and here are a couple of my favorites:


I love lace on quilts and I like Christmas based things as well.

This Patchwork France group does a lot of traditional types of quilts. 

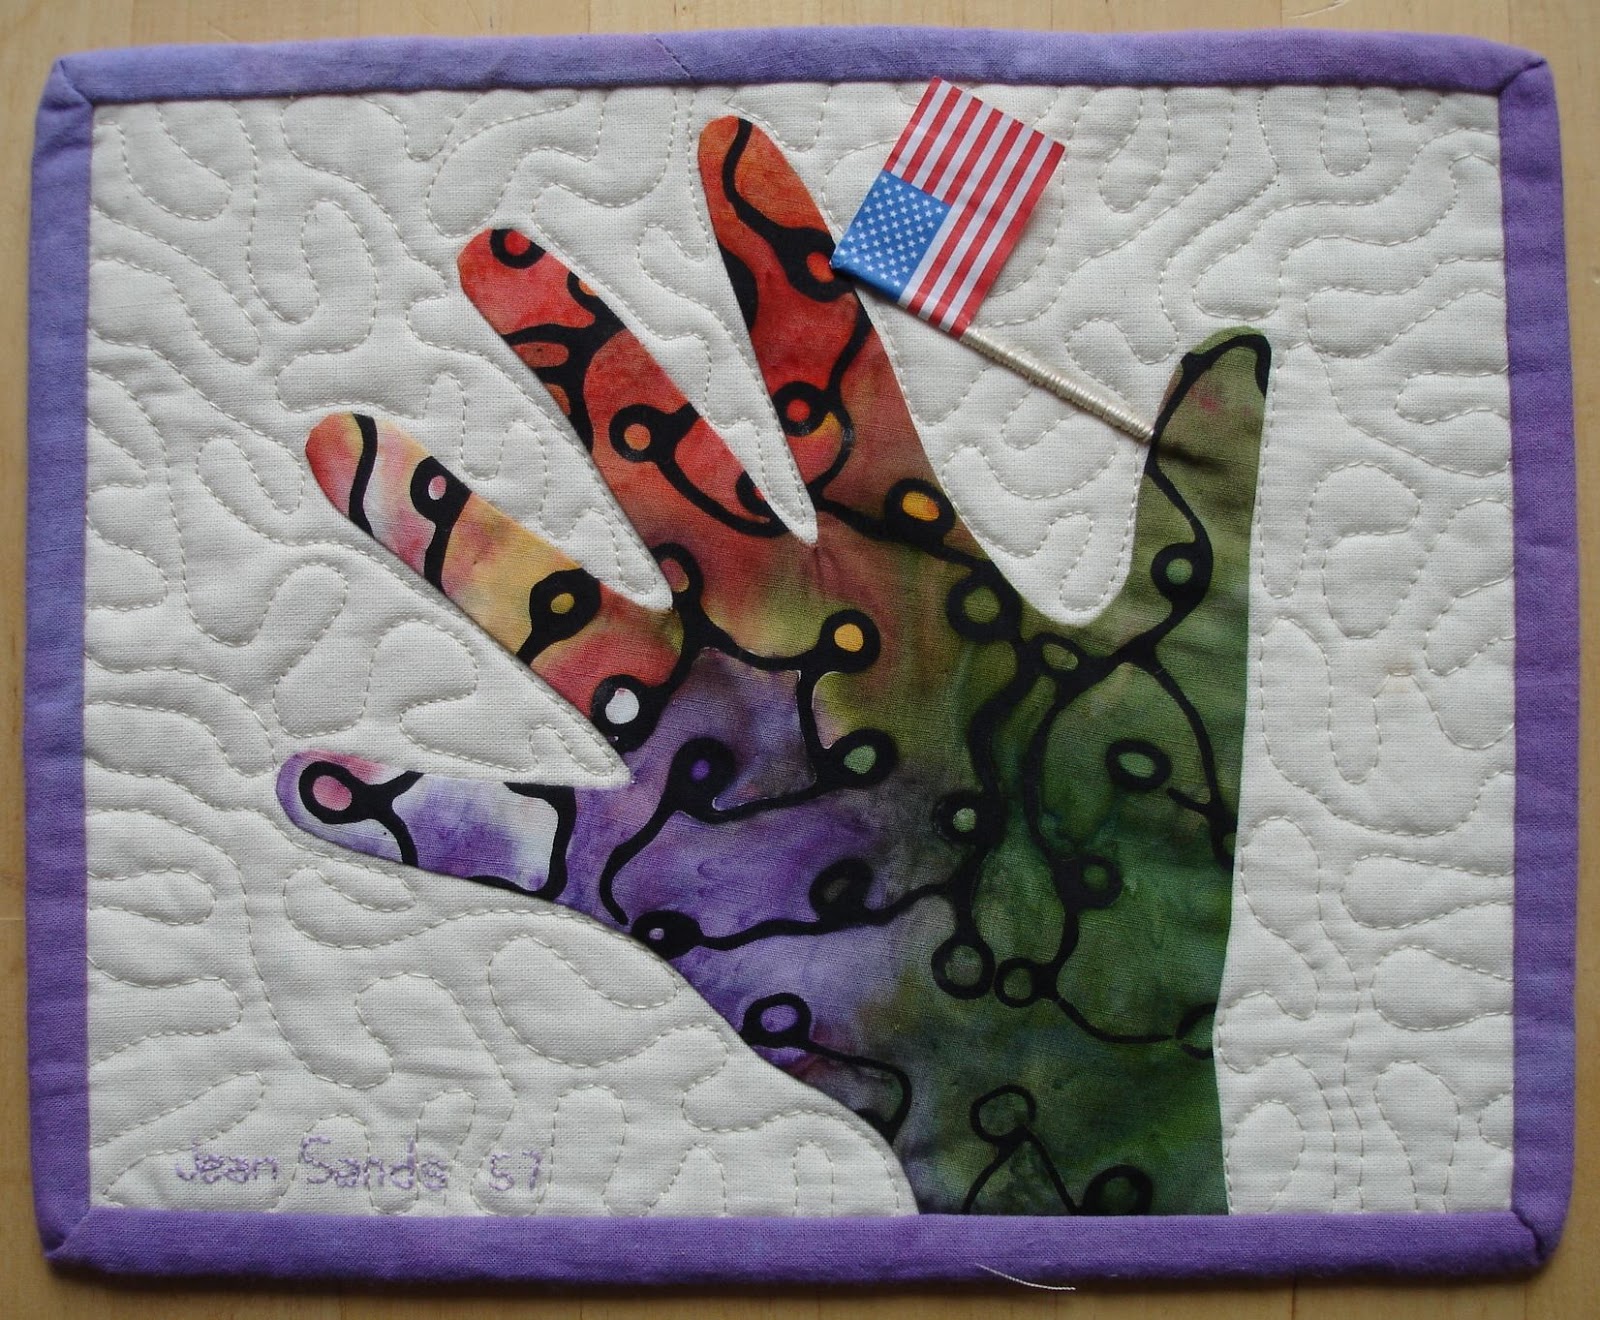
Lastly, years ago there was a Patchwork France backed hand quilt. We were all asked to make a block of a certain size with an applique of our hand on it. We were to personalize it anyway we wanted to. Here was my submission. It was in the show in Alsace, Sainte Marie aux Mines. I gave up thinking I would ever get it back. At the meeting they handed them out to those of us who made one. What a nice surprise!


Monday, November 3, 2014

Adventures at a Flea Market

Finally, most everything is washed from the flea market for everything sewing I went to several weeks ago. In French these are called Puces des Couturieres. Just for fun, here are a couple of pictures of what one of these looks like:
Imagine an entire building overflowing to outside with nothing but everything you would want for sewing, knitting and thread based craft work. What ever it is you are looking for you can probably find and most of the time the prices are pretty darn good.

This year my favorite find was a set of beauty pins. Someday I will use them on the back of some future Christening gowns. In the picture below, the center bottom one is sterling silver. 

It is not like I have seen this type of thing before, I have not, but when it rains it pours. Much to my surprise, I also found a set of five, inexpensive ones, made out of some sort of nondescript metal in both silver and copper. The set of five are still attached to their original card.  In the picture below, the center bottom one is the silver one.  All of them are in excellent condition and very usable for where ever I decide to use them. Aren't they fun?
As for lace, There was plenty to be found. Here is a subset of what I found. Lots of fun stuff to play with later:
I love vintage rickrack, it dyes beautifully and has a different feel to it than the modern 100% cotton stuff.  I buy it when I see it.

In the green boxes are initials that one would affix to clothing or linens. I searched out and bought those that were 100% cotton. The last of the vintage ones were made of cotton polyester. Below are examples of 4 different ones I have found. The Poly cotton ones were tossed in my bag for free.  
Looking closely you can see the difference of the "A" poly cotton and the 100% cotton ones.

At the very top of the picture is lacet and lace tape.
Lacet is a kind of a lace tape, also seen in the picture it is very plain (far left and far right), but used to either adorn something, to cover seams or strengthen something. Many times, in investigated a vintage garment lacet was used for the waist of a garment so that the lace would not tear. It was also used as a joiner for laces, usually in a hem application. Just like the lace tapes, there is a thread that can be pulled to shape the tape if needed.

If you needed vintage cotton/linen sheets, they were there in many sizes.


One lesson learned about buying vintage lace is that one really never knows what was bought until it is washed. 

When I buy lace, the first thing that happens when I get home is they are sorted between clean and those with that musty and smelly patina.  Those that need it are washed. None of this careful stuff. They are tossed in the washer. The smaller pieces and lace lengths are placed in net bags (ok, some what careful) so they do not get completely snarled or lost in the wash. Bigger pieces can stand on their own. When they come out of the washer they are laid flat or hung to dry. Anything that turns to lace mush in this process gets tossed in the trash as it is unusable.

Next, ironing. This is where items are checked for sturdiness. It is funny how lace will stay together in the wash but rip apart as it is ironed. This is a sure sign of dry rot. Also ironing is good for close inspection. Stains or damage is found at this step. Pieces can be sorted between those to repair and those that will be used as lace "bits". Dry rot lace is set aside for later use in some sort of altered art project.

If the item is stained, it may go into the BIZ bucket. Biz is an all fabric bleach that does a wonderful job at whitening lace and linens. I say may because if they item was made with a dual color thread, actually quite common, Biz will take the color out making the item very one dimensional. Here is a close up of something dirty.
This has been washed once at this point. Originally it was all the dark brown color and the item appears to be solid in color. Now it looks like this. Is it just dirty or are those brown lines supposed to be there?  

If in doubt soak it in a mild soap. Here is what the end result will look like:
Yes the brown is supposed to be there. It gives the piece a beautiful 2 dimensional look. Any bleach product takes the brown away and what is left is something, although pretty, is not as beautiful as it should have been without the bleach.

The blue on the old sheet from my last blog entry is in the biz bucket now This one, as I suspected, is going to be a hard one to get clean. I am about to up the amount of Biz in the bucket to see if it will come out. I suspect it will need to soak for weeks.

Thursday, October 16, 2014

Vintage Linen Find

One of the wonderful things about living in France are the many opportunities one has to find vintage lace and linens. Every attic in France must be filled with the stuff and when it is time to clean out the attic, garage or basement, these precious pieces end up at rummage sales, second hand stores or flea markets.

Last weekend was one of my favorite flea markets. It was one of those flea markets that are for "just sewing". Everything from quilting, weaving, felting, embroidery etc... show up at this type of sale.

At one of the booths, a woman was selling old linen sheets the size for a single bed, She had a small box of them, maybe 7 sheets. They are too small to use on a bed I own but since they are linen or a linen blend, they are perfect for re-purposing. I bought the 3 of them that had embroidery on them. 

The  workwomanship on the embroidery is superb. The technical issue of how to end the embroidery however is less than elegant. But no matter. The third one I picked up, was very dirty and looked to be just a linen sheet with no embroidery. I was about to return it to the box when the sales woman folded it open. Inside was embroidery and, most surprisingly, a pattern.  She removed the pattern and was about to toss it in the trash bin behind her when she thought to ask, clearly in French, if I wanted it. The look on my face must have been priceless as if I was saying, Nooooooo! Don't throw that out! 

I of course said "yes please". 

To say the sheet was filthy is an understatement. This is what the sheet looked like when I bought it. As you can see, the sheet is pretty dirty, both dirt and water staining. The sheet has a nice mold smell as well but no mold spotting anywhere on the sheet.
The linen sheet turned out to be a work in progress that is close to being complete but never was. With all of the different linens I find, very seldom do I find a pattern that matches the work done. But, when I do what a treat!

So here is the part of the pattern sheet of interest:
Look closely at the picture and you can see the trace lines on the pattern.

Here it is on the linen sheet:
The pencil marks can be seen under the design as well as some sort of blue marks 

Here is the back of the sheet:
Beautiful work. The maker took liberty with the design as the border is different.

Here what a finished area looks like. There are additional nubbs on the edge. 
The blue marks are quite visible on this portion of the sheet. 

Lastly with all the work that was done this is how the embroidery was finished. I have never seen it done this way and I must say that it is not attractive.
Looking at it, it looks that the maker could have made each of the  curves just a little longer with a little more spacing between each eyelet designs. That way she would have been closer to the edge of the sheet.

One could argue that the end of the edging is the sheet's turn down point, and I agree, but the flower design goes beyond the end of the edging work. The other two, the design ends exactly at this point at the end of the edging work.

All 3 of the sheets are finished in this manner but have different embroideries. Missing on this sheet, but present on the other two are the initials BC
This is one of the other two sheets. Notice how this one has the pulled thread work along with the embroidery along the edge.

To clean the filthy sheet, first  it will be washed in water. Hopefully the blue is gone and the pencil fades, but I doubt it. If the blue is still there it will get soaked in water for a bit more. After that it will be washed with soap and, if need be, will take a soak in BIZ.

Back to the pattern. The pattern sheet is SupplĂ©ment number 323 from a French magazine called Madame. 

I had never heard of this magazine nor have I ever run across one anywhere, in all my wanderings in France. So I did some research. The magazine by the same name, "Madame" Figaro, or for that matter, Air France's magazine Madame are not the same magazine.

I found a few pictures of the covers of various 1920 through early 1950's Madame magazines on the internet and I found two issues for sale in the United States on eBay.  Click on eBay to the left if you are interested.
The Seller on eBay was nice enough to give me information on the two issues. The magazines for sale were published 4 February and 13 May 1926. (One begins to wonder how they got to the United States.)

Based on their issue numbers, I was able to figure out the magazine was published every other week. If that is true, my pattern was published the week of 9 May 1930. 

This date matches the sheets. From experience, and I am hardly a historian, but I do observe and ask a lot of questions when I buy old lace and linens. The sheets appear to be an older linen/cotton blend which tells me they are most likely pre-WWII. There is a difference in the feel of the sheets before the war. The pre-war sheet is thicker and have more unevenness in the weaving as well as thicker linen threads showing up in the weave. The older the sheet the worse this is. The sheet is cold to touch which is one of the ways to tell older linen. When it is dirty, it is really hard to tell if it is linen or a blend as the dirt gives it a linen appearance. Technology got better after the war and the cotton or cotton/linen blends are thinner and smoother. The salvage edges are also different. Smaller loom and dense woven edges. Many times in the past I have found two of this type of narrow sheet whip stitched together to make a larger sheet.

I will keep you posted on the sheet and it's cleaning process.


Thursday, October 9, 2014

Five Layer Three Dimensional Heart

Isn't this fun? 

I thought I would see if I could do something in 3 dimensions. Using a heart pattern in 3 sizes, think cookie cutters here, really...

Wonders what you can do with a little Decopatch (Modge Podge). The hearts were Decopatched to a bendable middle and then outlined with a straight stitch. The five layers were lined up and sewn together down the center. Fringe was added to the bottom of the largest heart. 

In my stash I had the red and ecru fabric with French wording on it. I thought would be perfect to use rather than using a more solid red fabric. To the fringe matching red beads were knotted in. The thread used for this project was a Sulky 12 weight. 

Possibilities are endless now on what I can make like this. I think the heart turned out great.