Tuesday, October 16, 2012

Quilts of Valor

In my spare time, that would be every other Wednesday, I head a group in Luxembourg  making quilts of valor.
 
Why Luxembourg you ask?
 
Well, if you are ever living in Europe and were not affiliated with the military, one of the ways to get a "taste of home", is to join an expat group. The closest one to my location is in Luxembourg and is called the American Women's Club of Luxembourg.
http://www.awcluxembourg.com/
I am a quilter, along with all the other sewing things I do, so when the opportunity came up to start a group within the Women's club, I signed up. We have advantages here. The big one is that we can hand deliver the quilts to the Chaplin's closet at Landstuhl Hospital in Germany.
This last weekend I got two of the quilts I am making or that my group has worked on to the point where they are as far as I am going to go at this time.
The first was part of a "Buck a Block" with a quilt store in Atlanta Georgia called Little Quilts
http://www.littlequilts.com/
If you a quilter, you would recognize the name since they write books as well.
I remember standing in line one the select  mornings, rain, sleet, sun and snow for the opportunity to buy my block for the month. Did I keep up? No, sadly not. AND I spent over $12 for the opportunity to not finish it. I suppose I should mention that I bought the finishing kit ($$$). In other words I have real money tied into this project sitting in my basement that needed to be completed. After the move to France, I brought over the bits and pieces of the not yet completed the quilt, where it continued to sit for another couple of years. This weekend I completed it.  It is ready for long arm quilting.
The second quilt is a New Years day mystery quilt done this last year called Merry Mayhem’s Mystery Quilt Case # 134: Chips ‘n Strips
http://webstore.quiltropolis.net/stores_app/browse_dept_items.asp?sid=&Store_id=430&page_id=17&Categ_Id=1800
Steps were given on January 1st, 2012 every several hours. I made mine a little larger so that it would be large enough to donate. It is because I enlarged it that I have a "petit problème". I did not cut enough for the binding so I have to wait for the next time I can go into storage stateside to cut a couple binding strips so that I can finish it.
 
 
Both quilts, to be completed need to make a trip to or need something from the United States. I have a favorite long arm quilter that does all of my quilts and while I am there I can locate and cut fabric to complete the Merry Mayhem quilt.

Friday, October 12, 2012

A New Friend for Kittie


It started with this Sulky 12 wt Blendables thread, number 713-4119. I have owned it for over a year and had not used it. I find this color combination a difficult one to use, my opinion and I am sticking to it. Over the past year I have tried at least 3 projects that I thought would be able to use it but, up until now  the thread has proved to be an unacceptable choice. Rather than toss it in with all of the threads, It has been out front and center on one of my sewing shelves, In my face, sort of speak, so that I would think of something to do with it. It has taken over a year, but one day a couple months ago it hit me.

 
French Kittie has a Friend!     
French Kittie
 For those of you who have not met French Kittie, let me introduce you to him.
French Kittie, this is everyone. Everyone this is French Kittie.
 
You know, I think he likes y'all.
 
Here is a profile picture. He is very handsome don't you think?
 
 He is my sewing companion and holds my seam ripper. He is always perched on my machine next to the bobbin winder of my Bernina. Since I have made him, frustration seldom hits when I need to rip something out. All I need to do is look into that little cute smiling face and I smile back.
 
French Kittie is truly international. He is constructed using Japanese fabrics I bought in Luxembourg and he was made in France. Once a year there is a craft market in town called Creativa. It was there I found the little trinkets that I could use around kitties neck. It is the Eiffel Tower that gives him his name, "French" Kittie.
 
French Kittie used to be part of a litter of kitties, but they have all been given away and found homes. Here are some of them on the way to the United States to be adopted. They were part of a Christmas ornament exchange.

Most reside now in the United States, but one, the prototype tom cat, lives in Luxembourg and three have taken up residence in Germany.

Oops,  Take heart and know that you are nothing until you have ignored by a cat!
French Kittie has been lonely as of late. He has seen a partial prototype of something in the sewing room for several months now on the sewing table. I don't need another holder of a seam ripper, that would just make French Kittie jealous. I could use a holder for my all important red memory stick that is right now temporarily misplaced. It will turn up...I hope.
 

This morning I finished French Kittie's new friend. Since I am original with names, may I introduce Panda.
Since I have domesticated Panda, he too has a collar. Panda has a little red bell around his neck that has little Chinese letters. Loosely translated I think it says "Yankee go home" but I am not sure, My Chinese language skills are not that strong.


Panda is made of vintage white linen and whatever type of black linen I could find around the house.

I used four different Sulky products to make him.
 
His eyes, nose and mouth are hand sewn using Sulky 12wt black cotton (713-1005) and the pads around his eyes were made gray by using a black Iron-on transfer pen. Around his eyes are darker than this picture shows. I love using the transfer pen to either shade things or to mark a pattern. The color is permanent so once on it stays. The 4th product, not shown was a tearaway stabilizer. I needed that to make sure the area did not pucker.

What about the black and white Blendables you ask? Pandas are black in front and black and white in the rear. Let me have Panda turn around for you.
He's a little slow. Ahh there he goes...
I found better stitches to use, but I had this piece ready to go and it is the prototype after all. I think that the pin stitch works best. The piece is zigzag with a pin stitch at the bottom.  After I made the piece I figured out that there was a better stitch choice. Since the piece was ready to go, I just used it knowing I would be making him again. Here is the stitch sample using the pin stitch in both directions covered by a zigzag.

A much better choice. So, as soon as I proof the pattern I will change his stitch. In the meantime, I have to let him sit for a while to see if I think his legs are too long or that I don't like is tail or maybe he is too fat or thin. I will also look at him and the way he stands. Is his face cute enough? Are the ears in the correct location and are they big enough. Time will tell me. 
In the meantime, there is some bonding happening. They like each other and it shows.
Enough, I have to go now, I am supposed to be making a scarf.

Thursday, October 11, 2012

Vintage Lace Inspirations

Sometimes when I am at a flea market, something catches my eye. Now I am not an expert on lace, but I know what is ordinary and what is not. This last weekend I ran into some "inspirations" and a couple fun laces that I had to add to my collection.

The first, an "inspiration" is bobbin lace. Now I have seen vintage bobbin lace everywhere, but what makes this one unique is the use of color to define the pattern.
 
The blue thread was added later after the design was completed. If you look closely the blue outline is a well sewn whip stitch out of the same weight thread as the bobbin lace.
 
The next time I find a pretty bobbin lace, I am going to see if I can add to its look by adding color in this manner. In the mean time I have several yards of it and  I am thinking a sweater or a shirt would be a great use for this.

The second "inspiration" made me stop and take a real hard took.
 
Yes that is rickrack and it is crochet. I am looking hard at this one since it would apply itself to Battenburg and point lace. What fun!

The last two are just fun.
 
They are a zigzagged insertion lace. These will add a lot of interest where ever I end up using them. I do not find this type of thing often.
Hmmm, now what to do with them...

Monday, October 1, 2012

Battenburg Lace


As a collector of lace bits, a couple years ago at a flea market, I purchased a small quantity of lace tape. I was intrigued as to what to do with it. I have always loved Battenburg lace, well at least the stuff that is not made in China, that is. Gratifying is the sight of a well made, older Battenburg lace object no matter what form.

On line I found:

How to Make Battenberg and Point Lace, by Nellie Clark Brown, The Priscilla Publishing Company, Boston Mass, Copyright 1900 http://www.cs.arizona.edu/patterns/weaving/books/bnc_lace.pdf

Madame Goubaud's Point Lace Book, Second Edition, Ward, Lock & Tyler, Publishers http://www.cs.arizona.edu/patterns/weaving/books/gm_lace.pdf

In the first book, Nellie takes you though the information needed to make simple Battenburg lace objects. As with all older books, at times the description of the steps leave much to be desired. In the second book, Madame Goubaud does the same thing in different wording.

 Between the two books, enough can be learned to begin. Modern methods  need to be employed since many of the things used in the original methods no longer exist.

Let's take a tour of what you need and where to start.

Lace tapes/Braids

The picture  shows six different types of lace tape and braids. The top three are modern. The top one is from Martha Pullen Company and is called  3/8" Lace Tape. The next two below the Martha Pullen company lace tape are the most common type of lace braids which can be purchased today.

Lace tapes
 

Finally, the bottom 3 lace tapes/braids are vintage. According to Madame Goubaud's Point Lace Book, the bottom most lace tape is an imitation of point lace work of the fifteenth century. We learn something new every day don't we?


Historically, lace tape/braid was made from linen, and the thread used for the point lace was linen or cotton.


Preparation of the pattern:


The paper pattern - leave about  1/2" to 1" extra around the edge of the design. Cut the same size, a piece of plastic (the type you would cover a child's schoolbook with and a piece of the Kraft paper. Baste the 3 layers together with the Kraft paper on the bottom, the pattern as the sandwich in between and the plastic on top.


Application of lace tape

Here is where any knowledge in heirloom sewing comes in handy. The drawing below illustrates how the tape is basted down to the 3 layers basted together in the last step. This is from Nellie Clark Brown's book , How to Make Battenberg and Point Lace, page 2.


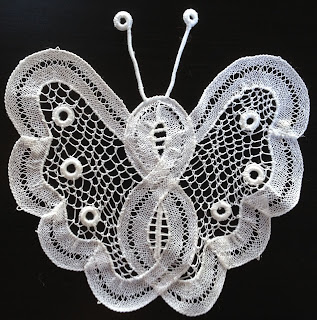
For a butterfly I made, this is how it looks. Use a contrasting thread, for ease of removal later, Whichever way the design twists, baste on the outside curve. Just like in working with French lace, (this is the heirloom sewing part) this modern lace braid contains pulling threads. Those are carefully pulled to draw the inside curve flat.


A nice to have supply
 
I do not have one, but I am looking for a ring gauge. The ring gauge is used to aid in making the round circles of thread seen often in Battenburg lace objects. Nellie notes in her book that we can buy "very excellent rings". Ya, right, not in this century! I did look, unsuccessful at both Wal-Mart and Eurodif (ok, I really did not look) Might I suggest we make them ourselves? They are not hard to master, but the idea of making 100s of these for someone to buy is mind numbing.


Small Aside About Thread

The models you see in the photos use both the DMC Cordonnet Special, 20g N 80 and N 60 threads. In the pictures, the ring on the left is No 80 the one on the right is No 60,  Note the size difference due to the thread thickness.


To make a button hole ring, the thread is wound around the base of a fork tine 20 times. Who needs a ring gauge anyway???The more wraps the thicker the ring is. Less than 15 wraps leaves a less than desirable look to the ring. More than 25 makes the ring too thick. Wrap the thread tightly at the same level at the bottom of the tine catching the start of the thread in the wrapping process. Hold the wrapped portion in place with your thumb as you cut the thread about 16 inches from your thumb. Thread a needle with this thread end. Slide the thread wraps up the tine a little so that a needle can be passed repeatedly around the roll of thread between the wound thread and the fork tine. After 1 wrap begin to make several button hole stitches. Push them flush with each other. Slide the thread wraps off of the fork and continue making button whole stitches until the wrapped thread is completely covered all the way around. Leave the additional thread on the ring.

 
Here is one of the rings after it is placed in the Battenburg lace design. This picture to me is like when someone checks the inside of your garment to see how well you finished the seams.

All of the fill stitches also known as Point Lace came from one of the two books, So here now were two of the 4 butterflies I made.. I learned a lot


Enough with the butterflies and I do not need more doilies. Then, I found this book...
Dillmont, Th. de, ed. D.M.C. Dentelle Renaissance, La. Mulhouse, Dollfus Mieg & Cie, [c.1890] 76 pgs. + plates and patterns.
http://www.antiquepatternlibrary.org/pub/PDF/DMCDentelleRen.pdf
The information about the book says "Needle laces made with manufactured tapes and braids (many no longer available) that work up quickly to stunning results." 
Sounds interesting to say the least.
I download it
The book, originating from Mulhouse tells me that it will be written clearly in French, which it was. Mulhouse is located in Alsace and at one time was a huge manufacturer of everything from thread, fabrics and patterns of all sorts. You can still buy fabric made in and near Mulhouse. Beautiful, French country wovens called Kelsch. But I digress. Back to the book...
Just like my picture above, they have many lace tapes and braids that can be used. The book has lots of ideas for making yardage of lace. Wait! I have some of those laces in my stash! I had no idea where one would use them or how one would use them. well not quite true. I have a baby bonnet with a silk lining that is made using one of the top lace braids on the right side.


So, back to the book, I found this lace:

 
And the pattern was included in the back of the book:
And I know how to make Battenburg lace, I found my project!

I start sewing, and sewing and sewing. I get to the flower part and nothing works. I tried Floche, Sulky 30 wt, 12 wt, silk antique stuff I got at a yard sale, DMC Cordonnet Special, 20g N 80 and N 60 threads. I stop and look to see how this embroidery on netting is done. BTW. This is using all of my scraps of netting I have collected over the years. Netting is so expensive, I can't stand to throw any out.
I find a piece of a collar in my lace bit stash. If collars come in two pieces, over time one will be lost.


Here is a close up, hopefully you can see the embroidery better.

I finally decide to try what I should have started with; 6 strand DMC floss. So here is what I have. It travels well as long as the netting is in place and now that I know what I am doing it is going a lot faster.
 
Notice that I got rid of the second row of lace braid at the top since of all stitches I hate doing the spider web sort of thing. It is growing on me now that I am getting better, but it is still not something I like doing.
The braid on the outside edge I own nothing remotely similar. In Wisconsin I found the two inspirations below. Notice the poor-man application of the trim I am missing. (yes I paid 25 cents) Interesting. I might add it later, I don't know.
 

I plan to make enough lace for the bottom hem of a shirt and the sleeves. I will be working on this for a while since it is a great train or car project.

So here it is:

And a close up of it on the roll

No you may not order yardage.