Wednesday, October 30, 2013

Tee-shirt Transformation

This summer there was a sewing challenge I participated in. The challenge was to take a cotton jersey shirt in any style and we were to re-style it anyway we wanted to. As long as it was out of tee-shirt fabric, it qualified. We could even make one new if we wanted to, what we did to it after that was the challenge.

In the spare bedroom I have a small pile of clothing that need to go to the equivalent of goodwill here in France.
In that stack, left by someone who visited me well over a year ago, was a Chico blue turtle neck sweater in a size XL.
It had no stains and was in very good condition. It was not really my color, I do not look good in that shade of blue, but it was perfect for the challenge.

On line, I had taken, or better put, watched the Craftsy class called Hand-Embellishing Knit Fabric:Stenciling, Appliqué, Beading and Embroidery. The class is taught by Natalie Chanin of Alabama Chanin. The technique fascinates me. I bought her stitch books, all 3 of them, and read them cover to cover. I had a good giggle over the recipes. Some of the ingredients are difficult to obtain in France. My french friends found some of the recipes interesting as well. On my list soon is to try a couple recipes on them.

I pulled out some grey jersey I had in my stash and started to play making a small sample of the techniques taught in the Craftsy class.
Then there was the announcement for the challenge at the beginning of summer. Always up for doing something fun and creative, I joined.

I decided to make the Corset from book 1. 

In book 1, "Alabama Stitch Book: Projects and Stories Celebrating Hand-Sewing, Quilting and Embroidery for Contemporary Sustainable Style", re-use is stressed and the pattern and basic directions for taking an old knit tee-shirt and making something new with it are given.

In book 2, "Alabama Studio Style: More Projects, Recipes & Stories Celebrating Sustainable Fashion & Living", an interesting technique for appliqué is given where the design is enlarged so that when it is appliquéd into place, a wrinkled texture is obtained.

The blue shirt, not really being my favorite shade of blue needed something to make the appliqué stand out. I wanted to use the entire shirt (Where else would I find the same weight and texture fabric to go with the shirt?) 

I decided to dye some of the shirt so that the appliqué could be made darker. In my stash I have a number of procion dyes in various colors and one of them was navy blue. Perfect for the look I was trying to obtain.

Everything that was not used for the main pieces of the corset, all edge bindings and appliqué were dyed a darkish shade of navy blue. The entire shirt is sewn by hand using the recommended thread, Craft and Button 74% polyester, 26% cotton and uses the method spelled out in the books and in the Craftsy class. Grey thread was used for construction and beading rather than the blue thread since the blue thread did not coordinate with the blue of the shirt. 

Here is the final completed project:
Front
Back
Just a word about the sizing. The corset is meant to be close fit and low cut at the bust. I added an inch at the bust so that it was a higher cut and made a size medium. I normally wear a size small and now that the top is completed, it is still a close fit.

Sunday, October 27, 2013

Messenger bag

Recently there was a Bag making virtual event on Artisan's Square, a news group in English on just about all areas of sewing. To participate in the virtual event, one need to choose a bag to make. I chose to make a modification of the Don Martin messenger bag. I love the bag, but it was too big, not something I would use. I also had some size constraint caused by my choice of outer bag fabric.

Choice of fabric. For 50 euro cents I recently purchased a beautiful, fabric wise, A-line wool skirt. When purchased, the skirt was dirty and wrinkled, as such it was in the "take it for almost nothing" bin. There were two of them. One was grey and the other was blue. Both were in a size extra large. They had been sewn by someone with less than exacting sewing skills. The machine used to sew the skirts had its bobbin tension adjusted so loose that the bobbin thread just pulled out. It is a wonder that the skirts held together when worn. I thanked the person who made the garment for that as I took it apart.
First order of business was to wash both skirts. No special precautions were taken, both were just tossed into the washer on warm with a load of darks.  Both may have shrunk a little, but they both came out of the wash beautifully clean and ready for a project after they were line dried.
 
The blue one was taken apart, and after pressing, the 4 pieces were measured for possible purse size. Based on not wanting to have a seam on the main portion of the bag, here are the bag's measurements, on Don's pattern for the outside of the bag. These measurements do not include seam allowance.
 
I built a paper model to make sure I liked the dimensions. The other outside piece, the front flap measures  10"x 6.5" again without seam allowance.
 
Now for the inside of the bag. I wanted to reuse the skirt zipper for the pocket on the inside of the bag and, on hand, I had several zippers to choose from, from old blue jeans, for the outside pocket of the bag.
 
As usual things that could be used for and on the bag were assembled all in one place.
 
Months ago, my Bernina 180 was in the shop being repaired. I am lost without a sewing machine. Knowing I was about to be machine-less for weeks and maybe longer, I bought the bottom of the line Bernina, the B215. Even more fun for the future, I would have a machine to use while my 180 was busy embroidering something.
 
I also splurged and bought the Punch needle attachment for the machine.
 
That was months ago that I made that purchase and the punch needle attachment had not yet been put though a test as to whether it was a good purchase or if I should have left that capability for a stand alone machine.
 
Inspiration for the design on my bag:
 
The inspiration bag is from a Japanese magazine from 2010. I have misplaced the name of the magazine, but I loved the use of grapes and leaves on the bag.
 
I wanted to use my punch attachment So I designed something.
The curved lines were traced off onto the front flap piece of the bag using a chalk pencil:
 Using yarn left over from other projects, some pieces of hand dyed wool, a felted sweater found at a yard sale, I put my punch tool onto my machine. Easy installation, so far so good.
 
It is good to make a sample first, which can be seen on the photo of all of the assembled item for the bag. The sample worked beautifully so taking a deep breath it was time to punch the actual project. Here it is:
 
Stabilizer - just a word about stabilizer... in making a bag, to get that professional finish, use a fusible stabilizer. This bag took a medium weight fusible which was ironed onto the back of the two outside blue wool bag pieces. the flap was fused after the punching was completed, then the flap was then cut to size.
 
Ignoring any directions given for construction of the bag by Don, the top of the bag was assembled. A flap pocket with a zipper was installed using one of the old zippers from a pair of blue jeans. Look closely at the picture and there is a greenish piece of canvas that was added to the inside of the bag giving the bag more stability.
 
The lining was stabilized with a light weight fusible interfacing and then the pockets were sewn on. lesson learned from past bags is to always make the inside of the bag a light color so that you can find things at the bottom of the bag. The pocket and the zipper were installed 2.5" below the top of the lining piece.
 
Constructing the bag, wherever possible. the green canvas was cut without seam allowance to reduce bulk.
 
At a yard sale recently was a roll of blue belt webbing of the perfect color to match the bag. The black strap buckle was the only item purchased specially for the project.
 
Here it the completed project:

 Here it the completed inside:
 
Finally for a "pop" of color, what you see when the outside pocket is unzipped:
 

Wednesday, October 23, 2013

More Remakes of a Canvas Bag

After finishing the last bag, enough red fabric was left to make a second, larger bag. I did a felled seam across the center bottom to seam two pieces of the red fabric together to get a piece large enough for the bag. The felled seam was used because the bottom of the bag had to be able to hold the weight of what ever would be tossed in it and it needed to be neatly finished to give the bag a polished look. Again, the edge stitching foot was used to make the seam beautiful a straight.

Besides working on the red bag, There had also been a donation of fashion fabric, the weight of a light pair of blue jeans. Also in the donation pile was a coordinating old German tablecloth.

I started with the blue bag and I changed the measurements by adding a inch to the width of the bag.

Cut:
1 - 30"x 20 1/2" Rectangle for the body of the bag
2 - 26" x 4 1/2" rectangles for the handles.
Pocket cut  2 - 8 1/4" x 7"
 
Here is the final product:
 
There is enough fabric for a second bag. Next time I am going to line it and change the design again, a little, maybe an embroidery on the pocket too.
 
Now, back to the final red bag. The blue bag was a nice size, (They are all nice sizes) but I wondered what I would get if the width again was widened by another inch. That would mean to cut:
 
1 - 30"x 21 1/2" Rectangle for the body of the bag
 
2 - 26" x 4 1/2" rectangles for the handles.
 
Pocket cut  2 - 8 1/4" x 7" Turned on its side with only a 1/2" seam allowance.
 
 
This is what the final result looks like. Here is side one:
And side 2:
 
Credits where credits are due:
The embroidery designs on the red bag are from Urban Threads and are part of their Steampunk Carousel collection. The 4.84"wx6.26"h worked beautifully on the bag.
 
I forgot to mention last blog that the red bag is sewn together using red 12 wt cotton Sulky thread. Love this stuff and it made such a nice looking stitching on the bag. If this is not something you can find, It is very limited here in Europe sold through
Gütermann , try finding the heavier weight Gütermann creative threads. Here is a pack I have for sewing blue jeans. I found it in Germany at a Karstadt.
 
 These threads are polyester based, but for something like a bag, you really want to use a heavy weight cotton or the polyester or poly mix threads. Lesson learned years ago when I made a bag using quilting cotton.

Friday, October 11, 2013

Remake of a Canvas Bag


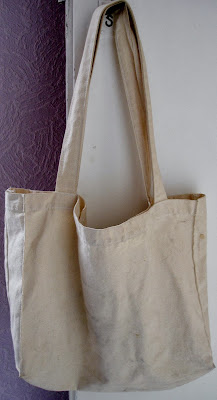
Years ago I acquired an off white canvas bag, the size and shape perfect for shopping or hauling sewing project around.

It became one of my go-to bags when I grocery shop here in France.

As you might know, in France, as with much of Europe, when you buy groceries you either bring your own bag to carry home your purchases or you have to buy one.

I am frugal and I HATE buying bags.  I know, they are not expensive, but it seems such a waste of money to me when I have perfectly good canvas bags I can use.

The quilt shelf - At the club in Luxembourg our quilt group has a set of shelves for storing everything from sewing machines to fabric. Every once in a while I get a note from someone at the club saying I need to tidy up my space because there are bags on the floor.

When this happens, I know someone has donated fabric to the club. and normally it is left in bags on the floor in front of our shelves. The donations are always welcome and many times the fabric donated is not quilting cotton. Donated fabrics have included polyester, silk, heavy cottons, corduroy and linen.  Someone donated yards and yards of Christmas fabric! What do you do with this? When I receive a donation, I go through it. If it is not something we can use for quilting it goes in a special stack. Anything really not usable is thrown away. My non-quilting cotton is now one of our full bins. Maybe it is just me, but it is difficult to make a Quilt of Valor out of Santa fabric. 

This last week some of the group started to make bags out of this non quilting fabric. We plan to sell them to raise money to buy backing fabrics for our quilts. Thinking of bags made me think of that canvas go-to bag. It is easy to trace off the pattern, so trace it I did. So follow along as this bag is made and maybe you can make one for yourself.
 
The bag is unlined and made out of canvas or similar weigh fabric.
Cut:
1 - 30"x 19 1/2" Rectangle for the body of the bag
2 - 26" x 4 1/2" rectangles for the handles.
Optional pocket cut 1 or 2 - 8 1/4" x 7"
The 30" of the bag make up the depth of the bag and the 19 1/2" make up the width.
If adding a pocket do that first. There is 1  1/4" allowance for the top hem of the pocket and 1/2" allowance on the other 3 sides. After hemming the top of the pocket and ironing the 1/2" allowances to the wrong side, pocket placement is a centered 4" below the 19 1/2" edge.

Before you top stitch the pocket in place, pull out your edge stitch foot. For Bernina users this is the #10 foot. Due to the fabric weight, set your stitch width longer than normal, a setting of 3 is good. Move the needle position  so that your top stitch will be 1/8" from the edge when the center blade of the foot is snugs up against the edge of the pocket.
 
Top stitch the pocket in place. I hate getting those knots at the edge when I begin sewing, to get around having that happen, Don't never start at the edge, instead, go down 1/2" or so. Back stitch to the edge and then straight stitch forward. Most of the time it fixes the nesting problem on the back side of the fabric. The edge stitch foot makes you look like an expert. Getting a straight line along the edge is effortless!
 
Handles:. Press the 26" by 4 1/2" strips in half, wrong sides together and then press each side in half again wrong sides together to get the 4 layered handle. Doing it this way is so much easier than trying to make a tube. Not to mention that a tube would not be as strong as 4 layers.
If you are worried about bulk, we will take care of that later.


Using the edge stitching foot sew both lengths of the  handle about 1/8" from the edge. Do not back stitch.

Top hem: The top edge hem allowance is 1  1/4".  To get a crisp straight edge, use a technique taught by Louise Cutting .
Cut a piece of cardboard into a strip. with a pencil draw a straight line 1/4" away from the edge of the cardboard.  Go to the ironing board and iron the edge of the fabric over the cardboard to the 1/4" line.
 
Repeat, this time the line is 1" from the edge.
 
To make a clean looking hem, use 1/4" wide Steam-a-Seam to hold everything together as you sew. Steam-a-Seam works much better than pins and there is no shifting.


Iron the 1/4" strip to the 1/4" seam that was folded over and ironed. Remove the paper, fold the hem  and iron into place. Top stitch from the wrong side.
Ok, handles done, pocket(s) sewn on and top hem of bag completed.
 
Sew the side seams: Fold the 30" length in half and sew the two side seams. 1/2" is allowed and to make it neat and tidy use a French seam to enclose the raw edges. That said, a serged or zigzagged edge would work just as well. Since the bag has a square bottom,
 

The bag was squared off by pinning the bottom center to the side seam. Draw a line making a triangle 2" from the pointy edge. Sewing from one end of the triangle to the other along the drawn line. Excess triangle can be trimmed or left. Some say leaving the triangle intact keeps the bag stronger. Turn the bag right side out.
 
Take the bag to the ironing board and iron a crease 2" from the center. The crease should intersect the edge of the sewn triangle. If not measure what that measurement is and use that for this step. Repeat this ironing step for the remaining 3 sides.
 
  
What gives this bag a unique feel are the corners. once pressed they are top stitched using, you got it, the edge stitching foot. 


Edge stitch down one crease, 1/8" from the edge, across the bottom, and then back up the other side. the corner pivot is really easy with the edge stitching foot.

Stop 1/8" from the edge.

Turn the fabric (pivot) making sure everything that should not be sewn is out from under the foot and continue sewing to the next corner. Repeat the pivot stitching back up to the top of the bag. Back stitch at the beginning and the end.
 
Repeat for the other side of the bag.


Straps: A 1/2" seam allowance is added to the length of the strap on each side. Bulk could be a problem. To reduce it, from the side that will not show, cut out the layers of fabric away stopping 1/2" from the edge. on both ends of the strap. All that will be left is the fold on both ends.  See picture. Fold the cut end  up and place it against the back hem of the bag.
 
 
The handles to the bag are attached 4 1/2" from the center

The handles to the bag are attached 4 1/2" from the center.
I suppose you noticed I have embroidery on this bag? Here it is completed:

 
Credits where credits are due.
Embroidery machine - Bernina 180
Bag sewn with a - Bernina 215B
Embroidery design - Urban Threads Painted Leaves I love the sheer stitched designs!
Embroidery Thread - Sulky rayon 30 wt
Stabilizer - Sulky Tear-Away and Solvy (lightest weight water Soluble)
Fabric - Donated by someone to the Quilting group in Luxembourg