Tuesday, November 3, 2020

A Halloween Jacket

 Recently I took an on-line class from a woman named Deb Canham on making an embellished jean jacket using both the sewing machine and serger. The pattern she was making for the class was called the Stacie Jean Jacket. In the lead up to the class, we were shown examples of ideas of what we could make. The two examples she showed us were a jacket made from Kaffe Fassett fabrics and a seasonal fabric jacket made from Halloween fabric. Before her class, I was thinking maybe muted Kaffe colors, but when Deb showed her Halloween Jacket I got all excited. Sulky had had a webinar with a woman by the name of Desiree Habicht of Desiree’s Designs a couple of weeks before. During the seminar she made a steampunk Pumpkin Pouch. During the seminar she showed off her Halloween fabric line.  After the webinar was over I searched and found most of the line of her steam punk Halloween fabric. I bought it to make, I don’t know, I just liked it. I don’t buy without a purpose often anymore but, I really liked the fabric. The fabric line came with a panel of assorted steam punk pumpkins as well as a bird, an owl, butterflies and a cat. 

The coordinating fabric included a range of gear fabric in assorted colors and a border print of the cat owl and bird in one border and a range of pumpkins on the other border strip.

Quickly it became apparent that the Stacie Jacket pattern was not going to work. The three-piece front design would not allow for the use of the pumpkin pieces from the large panel.

In my stash I have two jean jacket patterns that I have never even cracked open. I settled on the Jacket Express #218 by Janet Pray, but it would need to be modified, to use the designs from the panel. 

If you look at the pattern cover, there are welt pockets on the piece that would be best for the panel pumpkins and it has a curved bottom hem. I dislike those. On the back, the center back piece was ¾ of an inch too narrow so it would need to be modified as well. for the final jacket, the welt pockets were deleted and side pockets were inserted.

In my stash I found a light brown denim that perfectly matched the fabrics.

This is what I started with:

I ended up not using the black and white stripe fabric which incidentally was not part of the fabric line, but I thought I might use. It turned out to have too much white.

There were not enough smaller steampunk designs on the panel for the entire jacket so, from Urban Threads, I found a steampunk gear embroidery design that worked perfectly for the upper left front of the jacket next to the pocket.

Speaking of the upper pockets, the pocket flaps were fussy cut from the border fabric. The cuffs were first cut out of the pumpkin part of the border, but like the black and white fabric, it was too white and did not work.

 Instead, the cuffs were substituted using more the border print used on the pocket flaps.

Deb Canham’s jackets have lots of embellishment done on the serger. Unfortunately, for me, I do not have the correct size needle for the serger to do a proper chain stitch so I had to switch to couching the threads down using my sewing machine. This is what I used:

Dazzle and Wonderfil soft poly for the couching and not shown a Sulky metallic for the curved vertical lines and a brown Blendables 12 weight for the curved lines on the jacket yolk and center sleeves.

Here is the result. Super cute!


Saturday, August 22, 2020

Tablecloth Re-Do

I have been collecting tablecloths, damaged are better but, anything really, if I find them, I buy them. I have many ideas in mind for them, things I want to try to make. Living part of the year in France and Germany, between you, me, and the wall, Germany is better the better country for finding colorful embroidered tablecloths and France is better for more dainty or delicate embroidered items and white on white.

Here is a small sample of what I mean. These are from Germany

And these are from France.

 Now I am not saying that it is always like this, it’s not. However, if I were to generalize, if I want colors on my embroidered tablecloths, most likely they came from Germany.

A couple years ago, I bought a garment; it was made in India using modal (a form of rayon). Although nice, the length was not quite right for me. Due to the length the way it tapers in at the hem meant that I really could use a couple of inches in width to fit me correctly and be at its flattering best. I am not fat, its just the length is not, well …right. Most irritating was that the garment did not have pockets. I need a Kleenex pocket or a place I can put my hands. I cannot stand sweaters without pockets, as I do not normally carry a purse.

I copied off the pattern from the modal ready-made garment. I added inches to the side bottom, adjusted the length and found a place to insert hidden pockets. 

Having shopped in Germany last year where my selection looked something like this:

I have a sizable tablecloth stash. I pulled several similar in color tablecloths and removed the heavy lace from the edges. I thought I might add it back later, but once I completed the garment, I found it did not need it. It went together fast with few seams and super easy to sew.

This picture shows my starting point, This is the same picture as before.

All are similar in background and embroidery color. The bottom left and center bottom pieces were not used. Notice the bottom left one has a hole in the fabric. I had to be mindful and work around holes and stains on all of the pieces.

So, here it is completed. 


The fit is nice and once the weather gets a little cooler, it will be a nice casual jacket to get comfortable in around the house or out and about.

Friday, May 8, 2020

Are you being productive right now?


I hope so. 

It’s been a little more than a month ago that I found myself back in the United states. I was in Australia, Heron Island to be exact when the news came that the group I was part of was being recalled back to the United States. There were 70 of us, students and professors, trapped on the island for the 5 days after the recall. Trapped due to a category 2 cyclone spinning of the coast heading down in the direction of Brisbane. We were fine. There was lots of sunshine and wind but no rain and importantly, no ferries to get back to the mainland. In those 5 days walks on the beach were wonderful. One could not snorkel or scuba dive due the very rough seas but the turtles were hatching and late at night, if you were lucky you could see turtles coming to shore to lay eggs.
So I am back. Adventures stopped for the time being. The kitchen upon arrival was empty of everything from spices and other shelf goods to what goes in the average refrigerator after it is plugged in. I have become reacquainted with my sewing room. Like everyone I have made a few masks and in doing so have noticed that certain sewing items are hiding on me. All in all after a month I have settled right in.

Someone told me that among sewers, most are not making something new; instead, they are pulling out UFOs and are working on them.

I am no different. In the basement I found a UFO that was intriguing enough for me that I picked it up to finish it. There is a good reason it was a UFO, but heh, what else to I have to do right now?

At least 15 years ago I was visiting an aunt of my husbands. She led an interesting life following her husband around as he worked in the diplomatic service. It was on that visit I noticed the rug on the floor under the dining room table. It was a rug of dragon designs. Getting permission, I copied the designs off the rug onto white kitchen garbage bags with a sharpie. I was super careful as to not in any way damage the rug.

At home, I reproduced the center dragon. I made that block twice after figuring out the best way to construct it after the many mistakes of the first. I took notes on what not to do. The first of the center dragons was made into a wall hanging and was given away. The second dragon was put away in a box along with the left overs of fabrics used as the amount of work to make what I wanted was daunting.

Fast forward 15 years. Challenge taken! I think I mentioned that the amount of work was daunting.  But heh, what else do I have to do?

So here is the starting point, a white kitchen trashbag with the dragon drawn on with a red sharpie.

First step was to redraw the dragon onto paper. When I redesigned my sewing room, I used Ikea furniture for the shelving. Between each of the pieces in the box was a piece of lightweight brown paper. I kept them all figuring I could use it for pattern drafting later.

Years ago the place I worked was getting rid of things they no longer used. One of them was a huge wooden light box that had been used to proof electrical designs for circuit boards. I took it, brought it home and later used it once before this project. It is very large and heavy. It is also very useful and a big help.
So the dragon was redrawn onto paper and then cleaned up. Then using a black sharpie, the lines were drawn. Did I mentioned that the amount of work for this project was daunting? Drawing the one in the picture onto the paper took a day. But heh, what else do I have to do?
Finally, the fun part began. Even though I had some of the original fabrics used when I made the first dragon, there was not enough for the entire quilt. As luck would have it I have a large fabric stash and was able to find enough fabrics to make all of the dragons.

So here is one of the dragons in the process of being assembled and sewn together:
I figured that I could use the center dragon that was already completed but when I laid it out on the bed it was clear that the background was ok, but not spectacular. The tone on tone that was bought to go with it 15 years ago wasn't going to be my first choice it was ok, but just ok. 

My style had changed a lot in the last 15 years. I took a picture and looked at it. The quilt on the bed under the dragons is pastel and suddenly, just like that, a new background was decided. 
Pastels, like the quilt on the bed wouldn’t work, but a mixture of tone on tones would. Daunting just took another step up, but heh, what else do I have to do?

Good thing I have a stash:

This project is still a work in progress; Every day gets a little closer to finishing. The 3 of the 4 outer dragons are complete, the last one is on the sewing machine being attached to the tone on tone background.
The center dragon has been redrawn on the brown paper and construction has started.
More to come…

Sunday, October 20, 2019

Using Flea Market Finds


Constructing the Christmas ornaments this year I received comments from friends and even strangers on the train about my use of recycled items. Seldom in what I construct do I use new materials. The abundance and cost of items at flea markets and second hand stores make an inexpensive alternative to buying new. If what I make turns out, I have saved something from going into the rubbish bin. Most things turn out.

This morning I went to a flea market here in town. The specialization of this market was on clothing. I was on the lookout for old jewelry. I was fortunate, it was worth the walk in the rain to get to the market.

So what did I find?

For starters, I bought a crystal hair jewelry piece. 

This piece will be deconstructed. The hair comb portions will find a use someday, but the strands of hanging crystals will work in all kinds of projects. Crystals, when found in a hobby shop, are expensive. Cutting the crystals apart, leaves the perfect place for a needle to pass through the bottom of the casing to sew the crystal to whatever is being constructed.

The hanging crystals are small and very useful. To the right are larger ones from a previously bought necklace found a couple weeks ago that has been cut apart. The metal that holds the crystal casings together was cut using a pair of wire cutters and then the, now cut, interconnecting metal cut pieces were removed from the crystal casing using a small pair of needle nose pliers. 

Some of the metal pieces can be seen just below the larger crystals. After a couple snips, you become proficient at removing the metal interconnecting pieces.

Ya, so, what will I do with them?

Below is a Christmas ornament. Made using the same construction method as the stars from the last blog post.

I found the felt trees on clearance at a local shop. After covering them with vintage lace, the larger crystals were used as some of the Christmas ornaments on the tree. 

From the necklace, there are enough crystals to make a second similar tree. I paid one euro for the necklace. The ornament is two sided and both sides are identical.

What else did I find?

Earrings and a necklace. 

The necklace was a pain to detangle which is why it was not worn by the previous owner. I bought it for the birds. The chain can be used for various projects later as well. Good chains are a nice find. No idea what I will do with it but it will go in my stash for later when I want to use it.

The last item was a pair of earrings. Just thinking of wearing them makes my ears hurt. Those earrings will be caught in the wind and pull as they are worn. I owned a pair of wood ones years ago, that went to Goodwill for that exact reason. Four small metal pieces make up each earring. Looking at the construction one can see that just a couple of rings, that can easily be removed, holds them together. Jewelry pliers will separate them. I see uses, due to the type of metal, they will not corrode, on a crazy patch quilt or perhaps a Christmas ornament for next year.

Tuesday, October 8, 2019

Christmas Ornament 2019


I was reminded this week that I have a blog and that some people I know miss it. I have been greatly neglecting this blog and will, at least until the end of the year, attempt to fix that. As happens so much life, life got in the way.

It would be nice to start with this year’s Christmas ornament. Every year I am in an exchange with eight like minded women. We all put lots of thought into what to make. The rules are we can send the ornament off any time after August. We beat the higher cost of Christmas postage that way, if we choose to. I knew that I had a trip to Boston planned for early September so that was my deadline. The cost of mailing them from France would be high and the next time I had planned to be in the states was going to be in December for Christmas.

I am a collector, not to the point of being a pack rat, but close. When I collect, it is for a purpose. Sometimes I do not know what that purpose is when I start. Whatever the item is, it percolates in the back of my mind for months, sometimes years until one day I know what to do with it or by then, do with them. 

One such example is the collecting of broken rosaries. For years, I have been collecting them. They are cheaper to buy broken. For example, last year I found two crosses from rosaries in a second hand shop in Germany. The price was right, as my goal is to buy them for less than 3 euros each. Normally in France, I find them for 5 euros each. 

Here are some of the ones I have found:
  
A broken rosary without the cross is a common find at flea markets in small town France. I buy them for the beads and the metal medallions.

Once in a while I buy something that doesn't quite make sense to me but once home and can do a little research can find what things are. For example in France it is not uncommon for a young girl to receive a bracelet such as the one below for either first communion or more probable confirmation. They are normally made of silver and fit a wrist smaller than 6 1/2 inches.

Or this, a form a chapelet which is held in one hand:

I at first thought it was a broken rosary until getting it home and looking at it closely. I had to looking it up. I had never seen one before.

Once a year, in August, my little town in France has a sale where vendors come from outside the city but also the shopkeepers sell of things that are on clearance at especially low prices. At least 5 years ago I bought a package of eight thick felt brownish grey stars and another pack the same size and color of Christmas trees. The color is probably why they did not sell. A brownish grey Christmas tree is rather an odd color and not very festive. The felt stars and trees languished in my sewing room for years. This year I pulled them out as well as some wide pieces of lace I had in my stash. 

As I began with my idea, everything I thought I might need was placed on the table:

Then using a glue stick, the lace was attached to the thickness edges (sides) of the tree and star, first to one side and then after it dried and trimmed, the method was repeated on the other side of the tree or star. 

The work in process:

The lace stays in place at the sides since the next step was to sew on the beads along the edge.  In the picture above, with all of the medallians you can just make out the beads sewn to one of the stars after the lace was applied. The needle went through the layer of glue with no problem.

Now, the decorating began. Rosary beads were fashioned into sections and sewn down on to the star on both sides. A cross was placed on one side and a medallion sewn to the other side. They actually went quite quickly, unlike the trees which are becoming a time sink.

The result, front and back, can be seen below
Front:

Back:

The stars have been delivered; the trees, for another exchange later this year are still a work in progress.

Wednesday, December 12, 2018

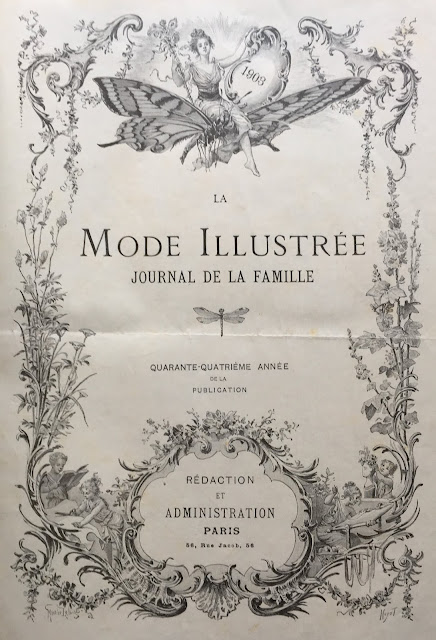
La Mode Illustrée, 1903

A couple of weeks ago I went with a group to the Christmas markets  in Strasbourg and Colmar. Both were delightful, Strasbourg being a larger cityhas a lot to offer when there is no Christmas market because of its many interesting stores, restaurants and cafes. 

Colmar is smaller and quaint. It has a nice covered market much like the one in my city. It also has a cobble stone old town. The Christmas market can be visited in in just a couple hours. Again, when cold, there are many fun shops. Walking past a book store that sells old books, I saw that there was a book in the window about fashion written in the mid to late 1800s. I have visited many book stores like this and have always come away empty handed but due to the book in the window I went in.

In the store was the owner and a middle aged french couple that were in the final stages of buying a book and a couple of old postcards. They had interrupted his lunch. On a old wood table pushed up against the wall under a shelf of books was the uneaten parts of his lunch on a hand thrown dark blue pottery plate. The knife and fork left in a position as to say "I am coming back". Next to the plate was a half of glass of red wine. I am always pleased to see this type of thing since it is so, well, French.

I said Bonjour and then listened in to the conversation the three were having about the postcards. Besides greeting me back there was no move to help me. You always say hello to the shop keeper when you enter any small shop. This is very French. This is just how it is done, greet, then start looking around or in my case take my time and wait and listen to the conversation. After a couple minutes the man of the couple turned to me and told the shop keeper that he should really help me.  The shop keeper turned to me and asked me in French which language I would like to use, French, German or English. This was way too fun so I answered him in all three languages but then in German told him that my best language was English.

I then inquired in English if he had any La Mode Illustrée books.  He thought about it and then said he had three books I might be interested in. The first was the book in the window. In pencil on the front inner cover was the price and how many fashion plates were contained within. I paged through it was he went to find the other two. Fashion plates and the descriptions of the dresses in french was not what I was interested in but it was a beautiful book with a breath taking price. The plates were beautiful and still had the thin sheet of tissue that separates the color page from the print on the previous page.

The second book was sort of the same, only smaller. the plates were not as nice but it was a sewing book. Again interesting to look at but not what I was searching for. The descriptions of how to construct things assumed that you were an expert seamstress. 

While paging through that book, the shop keeper was on a step ladder next to the table with his forgotten lunch reaching a book off of the very top shelf.  As he brought it down he exclaimed that he was sure he had one of these up there somewhere. 

He actually had one of the books I was searching for from 1903!

The conversation with the french couple started up anew as I was allowed to look at the three books at my leisure at the table next to his cold and neglected lunch.

La mode Illustréstarted publication in 1859. What years they published the books of the entire year I have not been able to determine. The books do not include the much sought after patterns but come in a nice bound book cut down just a little from the original magazine size. Starting mid year in 1897 the cover drawing for each weeks issue turned to color. I own a 1897 book which is why I know this.  

 The French couple finished picking out postcards, their book was placed in a plastic bag, several hundred euros changed hands, they bid me adieu and were gone. The owner of the shop then turned his complete attention to me. We negotiated the price down from what the inside cover said. He gave me a brochure on the upcoming antique book sale happening in town early next year and let me know he is in my town several times a year selling his books. There is a big antique market shamefully I have never been to once a month at the nearby convention center. Next year I will need to go.

So while you are here, I thought I would share with you several pages from the book.
Notice the fold line. None of my other books have this so I wonder if they were bound by individuals and not the publisher. I would think that if they were different, but all of mine have the same outside cover with letters spelling out the magazine name and year on the spine and are the same size. The fold is interesting.

Continuing on:
Darn we all missed this Monday, 30 March exposition of new fashion of the season by over 100 years. Seeing the price of the jacket made me wonder how much would that accordion pressed taffeta jacket cost in today's dollars? 

Searching on the web I found that in 1901 dollars 150 Fr would be approximately 572 Euros or about $652 USD in today's dollars. OK, a little pricey but you are in Paris and it is made out of yards of accordion taffeta. Not to mention the height of fashion.

I suppose we could buy the hat but hair styles and age must be taken into account:
Old ladies get boring hats. Some of these hats one needs to watch the door as you enter a room.

Continuing through the book, the wedding dress was really something:
Love those sleeves! There are variations to those and here they are:
Elsewhere there are drawings dissecting the sleeves so you at home can draft them. 

Continuing on I have decided I want that shoulder shawl thing:
I would wear that with blue jeans.

Now the reason I buy this particular magazine is not for the fashion. Instead, I learn a lot of things about items I find at flea markets. Take this piece:
Notice how this can be wrapped around for say, a sleeve, maybe at the wrist and tacked so it looks like one continuous piece of lace. I have found these and thought they were lace bits when in fact if I had 2 of them I could put them on a blouse at the wrist.

People are beginning to have this belief that I am an expert at dating lace. Here is a good example of something I might find bits of and now I can date it if I actually found a piece. Don't laugh, it is not that uncommon that I do.

Then there is the other items one might find. It is nice to know how these items were used:

How about a book cover?

There is a nice issue on the Catholic first communion:
Girls and the dresses is pretty normal to see. But what about the boys? 

Several years ago I saw something odd at a flea market and inquired into what it had been used for. It was a band with a bow on it made of satin and just a touch of lace across the bottom. Here it is, this is what the boys wore for first communion from the magazine:
I can and will be pouring over this book for hours but I thought you might enjoy this little peak.

Saturday, December 8, 2018

Autumn Adornment and other things

Sometimes I don't sound my own horn. It is a bad habit I have had since, well forever. 

Lets start by going back to last year. If you have read this blog you know that from August through December, for the past three years, I have been back in France. It is the best time of the year starting with warm sunny long days and ending with the threat of snow while drinking mulled wine at various Christmas markets in both France and Germany. 

Last year I had lots of time while there to be creative. France truly does bring out the creativity in me. At the end of the four months here I sent several items off to Classic Sewing magazine for consideration. They published me! In the fall 2018 issue there was an article about embellishing shirts with lace bits, one of my specialties, as well as an article about a jacket, an article called Autumn Adornment.

Its about Autumn Adornment that I want to focus on.

Several years ago I found three old yearly review books of the weekly magazine "La Mode Illustree from the years 1893, 1897 and 1905. In the one from 1897, during the months of May though August there were a series of four filet patterns depicting people in court clothing. I immediately saw jacket. As I don't "do" filet, I thought it would be nice to  convert the pattern to "red work". First off it is a fast form of embroidery and best, it is not too hard to do. 

I took the original from the magazine:

And redrew the design so that  all of the extra was removed and it was just a simple line drawing:


Transferred the design with a water soluble pen on to my fabric and embroidered it:

Finally I made a jacket using the four designs.

Here are my pictures of before I sent it off
Front:

Back

Far better than any picture I can take, you can see part of the article using the link for Autumn Adornment from Classic Sewing Magazine.

That was sew much fun to make and I should gets lots of wear out of it as well.